

Is Closing A Register Like Auditing
11 Till Management
There are two types of till management: Register Accountability and Till Accountability. Register Accountability is the default system mode and is used unless the organization is configured to use Till Accountability.
Register Accountability: A till is assigned to a annals and can be used past any cashier that uses the register. The first associate who signs on to the register is responsible for opening the till. The associate is then required to count the drawer. This process assigns the drawer to the current register.
Alternatively, the till tin exist assigned to networked cash drawers.
Depending upon your store policy, the cashier enters the total amount of cash in the till, or enters the quantity of each cash denomination. If a float amount (a configurable value) has been left in the till, the arrangement calculates the divergence between the float amount and the actual opening amount entered, and if there is a divergence, allows the cashier to recount the till or have the new corporeality.
Till Accountability: A till is assigned to a specific cashier. The assigned till tin be attached to any register the cashier may work on during the day. The cashier must count the assigned till and and so attach the till to a cash drawer/annals before ringing transactions. The system tin be configured to let the cashier to enter a total amount counted, or to count by denomination. For denomination counts, the cashier counts and enters each denomination separately and each count is saved into the organization.
At the terminate of the cashier'due south shift, the cashier must count and render the assigned till to the cash management part for reconciliation. This process transfers responsibleness for the assigned till back to the cash managing director.
Till Accountability too allows Dual Cash Drawer functionality, in which 1 register can utilise two separate cash drawers. This allows two cashiers to share a single POS annals while keeping their tills split up.
Annotation:
Refer to the Oracle Retail Xstore Betoken of Service User Guide for detailed data nearly counting tills.This chapter contains the following sections:
-
Till Accountability Process
-
Accessing Back Part Till Management Functions
-
Nearly Till Options
-
Nigh Till Maintenance
-
Register Accountability Way Functions
-
Till Accountability Mode Simply Functions
Till Accountability Process
The till accountability process follows a sequence of steps that require till counts whenever the till is moved or given to some other person. These steps provide boosted checks and balances each time the status of any till changes.
Effigy 11-i Till Accountability Process

Till Offset
-
Manager opens and counts the shop condom.
-
Manager assigns/bug tills to associates and confirms the starting greenbacks amount in each till.
-
Associate picks up the assigned till and goes to a annals.
-
Associate logs in to a register.
-
Associate is prompted to attach the till to the register. If multiple greenbacks drawers are bachelor, the associate is prompted to select a cash drawer.
-
Acquaintance attaches the till to the cash drawer in the annals.
-
Acquaintance counts the beginning amount of cash in the till.
-
Associate is set to band sales.
Till End
-
Associate tin can either end count the till at the annals (Count Till) or remove the till to count it in the Back Office (Remove Till). The counting procedure is the same in either location.
-
Associate counts the till.
-
Associate removes the till and returns the till to the director.
-
Manager marks the till every bit Returned in the system. The manager has now accustomed responsibility for the till.
-
Director performs the reconciliation count on the returned till.
-
The till is now bachelor and can be issued to another employee, starting the process once more.
Accessing Dorsum Function Till Management Functions
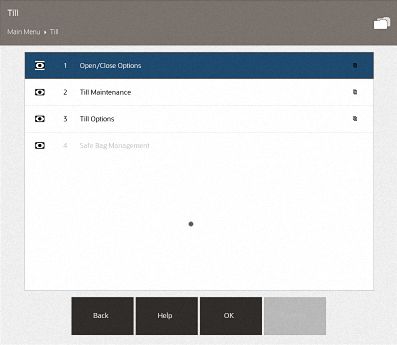
Assembly with the proper security permissions may admission Till Direction from the Back Office Main Menu. The Back Part Till menu offers till direction functions such as assigning and reconciling tills, till audit functions, changing the bladder amount, and making safe deposits.
-
Afterward logging in to the Back Office, select the Till option from the Master Carte and press Enter for OK.
Depending on the configuration of your system, the Till Options may too be bachelor from the employee login screen and the Register screen.
Figure 11-2 Till Carte
Tip:
You tin can also type the number associated with the menu option to access the function.
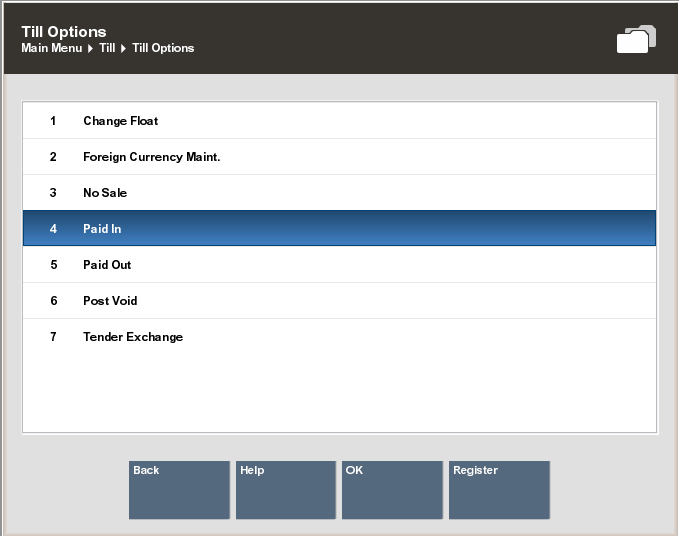
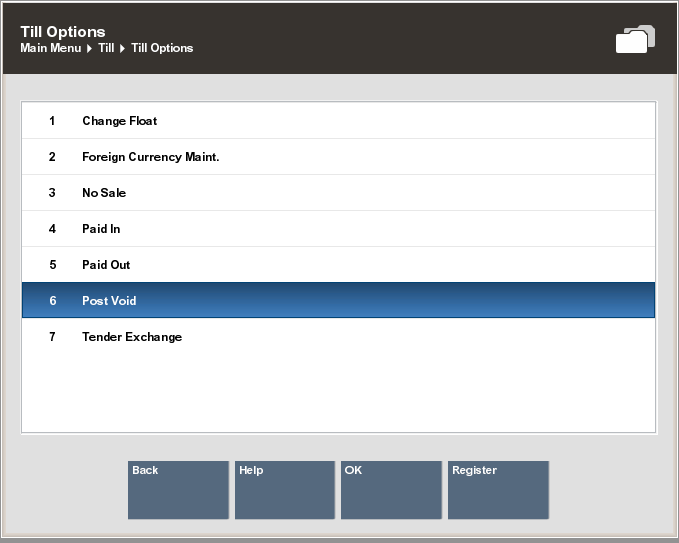
About Till Options
Select this pick for all functions that apply to a till in use by the annals.
Figure eleven-3 Till Options Menu
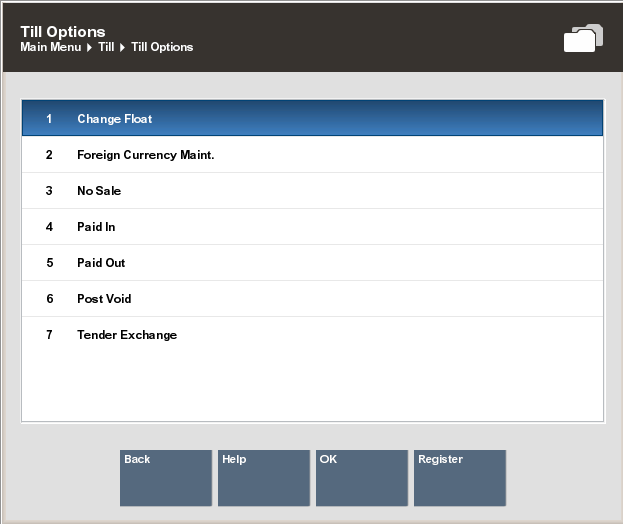
The Till Options card has the following options:
-
Alter Float - Select this pick to change the amount of greenbacks that remains in each till after the end count is performed. Meet Changing the Float Amount.
-
Foreign Currency Maint. - Select this option to update the exchange charge per unit betwixt the local currency and foreign currencies that are adequate tenders. See Strange Currency Maintenance.
-
No Auction - Select this choice to perform a no sale transaction to open the greenbacks drawer.
Annotation:
Refer to the Oracle Retail Xstore Point of Service User Guide for a step-past- step procedure describing the no sale transaction.
-
Paid In - Select this option to perform a paid in transaction. This choice requires an attached till. See Performing Paid In/Paid Out Transactions.
-
Paid Out - Select this selection to perform a paid out transaction. This option requires an attached till. See Performing Paid In/Paid Out Transactions.
-
Post Void - Select this option to perform a post void transaction. See Attaching a Cash Drawer Till for more information.
-
Tender Exchange - Select this choice to perform a tender substitution transaction, which allows y'all to commutation one form of tender for another. For example, take a customer's check for some amount and give them the same amount as cash.
Note:
Refer to the Oracle Retail Xstore Point of Service User Guide for a step-by- step procedure describing the tender exchange process.
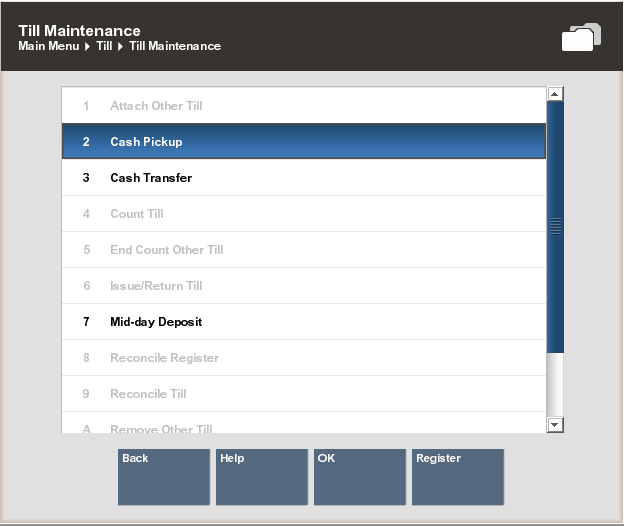
About Till Maintenance
Select this selection for all manager-level till functions, including the opening, issuing, attaching, removing, and closing of a till. Some options may also exist available to non- managers, depending on your store policy.
Figure 11-four Till Maintenance Menu
The post-obit section is divided into 2:
-
Annals Accountability Mode Options
-
Till Accountability Way Only Options
Register Accountability Mode Options
-
Greenbacks Pickup - Select this option to perform a cash pickup transaction. See Greenbacks Pickup.
-
Cash Transfer - Select this option to transfer cash to a till. Run into Cash Transfer.
-
Till Audit - Select this choice to perform a till audit (a count performed on an agile till).
Annotation:
Till inspect does not adapt the till counts; information technology is used only to count the till while it is fastened to a register. Encounter Till Audit.
-
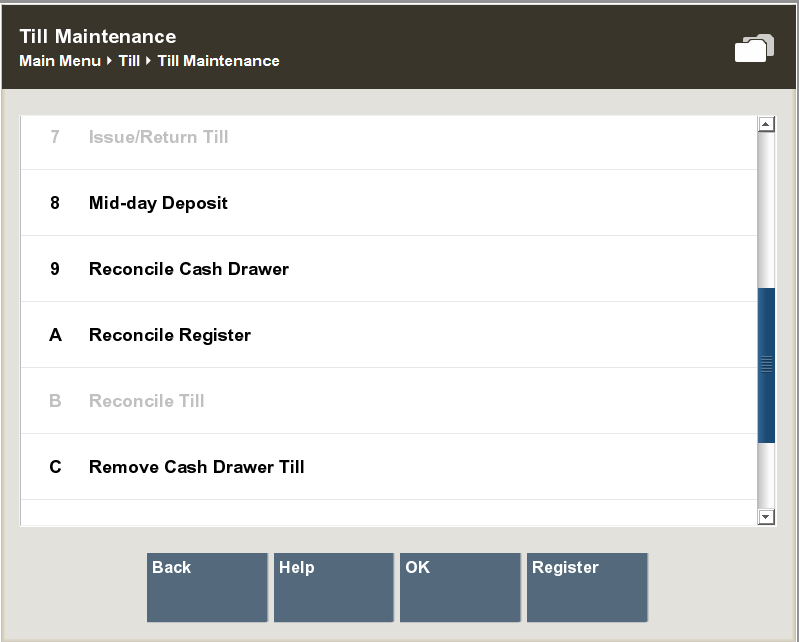
Mid-mean solar day Deposit - Select this option to perform a mid-solar day deposit transaction, which allows a manager to place funds into a store safe during the course of a working session. Run into Attaching a Cash Drawer Till.
-
Attach Cash Drawer Till - Merely used when networked greenbacks drawers are configured. See Attaching a Cash Drawer Till.
-
Remove Cash Drawer Till - Only used when networked cash drawers are configured. See Removing a Greenbacks Drawer Till.
-
Reconcile Greenbacks Drawer - Merely used when networked cash drawers and 24/7 trading is configured. See Reconciling a Networked Greenbacks Drawer Till.
Till Accountability Mode Merely Options
When using till accountability, the post-obit options are available, in addition to the options listed above for register accountability.
-
Result/Return Till (Till Accountability Manner Only) - Select this option to assign a till to a cashier and to enter the starting greenbacks corporeality, or return an issued till. See Issuing a Till (Till Accountability Mode Only).
-
Count Till (Till Accountability Mode Simply) - Select this option to perform a begin count or close count on a till. If a begin count was non performed on the till, this option starts a begin count. If a begin count was performed on the till, this option starts a shut count.
-
See To Perform a Begin Count for a description of the brainstorm count procedure.
-
Run into Closing the Register for a clarification of the close count procedure.
-
-
Attach Other Till (Till Accountability Style But) - Select this option to attach a till to the register. This option can attach a till that is assigned to yous or to another associate. Encounter Attaching Other Till (Till Accountability Fashion Only).
-
Remove Till (Till Accountability Mode Simply) - Select this option to remove a till that is assigned to you and attached to the register. Run into Removing a Till (Till Accountability Style But).
-
Remove Other Till (Till Accountability Fashion Only) - Select this option to remove any employee's till that is attached to the register. See Removing a Till (Till Accountability Mode Only).
-
End Count Other Till (Till Accountability Mode Only) - Select this option to end count a till assigned to any employee. Run into End Count Other Till (Till Accountability Mode Only).
-
Reconcile Till (Till Accountability Mode Only) - Select this option to count a returned till and compare your counts with the cashier'southward counts. See Reconciling a Till (Till Accountability Mode Only).
-
Store Prophylactic Maintenance - Select this choice for all functions related to the store safe. This submenu contains the following functions:
-
Open Store Safe (Till Accountability Mode Only) - Select this option to open the shop safe. Run across Store Safety Opening with Safe Bag (Till Accountability Way But).
-
Reconcile Store Safe (Till Accountability Fashion Merely) - Select this option to reconcile the store safe. See Reconciling the Store Safe with a Safe Handbag (Till Accountability Mode Just).
-
Safe Deposit - Select this selection to remove money from the store safe so that it can be deposited into a bank. See Preparing the Safe Deposit using a Safe Bag.
-
Store Safe Audit - Select this option to perform an inspect count of the shop condom. Meet Shop Safe Auditing with a Safety Handbag.
-
Store Condom Cash Deposit - Select this option to make a greenbacks deposit into the store prophylactic. See Store Safe Cash Eolith using a Safe Handbag.
-
Till Options
This section describes processes for the bachelor till options:
-
Changing the Bladder Corporeality
-
Strange Currency Maintenance
-
Performing Paid In/Paid Out Transactions
-
Post Voiding Transactions
Changing the Float Amount
The Float is the total value of greenbacks counted and removed from the till, just non included in the safe deposit. This cash remains in circulation to exist used the next fourth dimension the till is opened. This option can be used whenever yous demand to modify the corporeality withheld from the safety deposit, and can be adjusted per till. For example, you may want to change the float amount during the December holiday shopping season to program for increased sale activity.
-
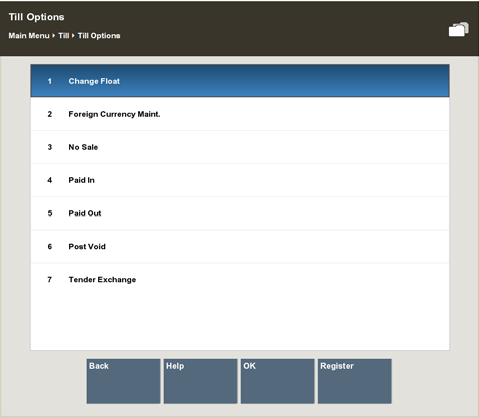
At the Till menu, select Till Options.
-
At the Till Options carte, select the Change Bladder option.
Figure 11-5 Till Options Menu - Change Float
-
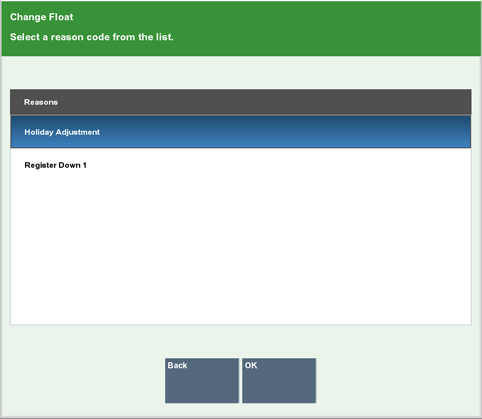
The organisation prompts for the reason you lot are changing the float amount. Select a reason from the list and printing Enter for OK to proceed.
Effigy 11-vi Change Bladder Reason List
-
Depending upon the reason you selected, you may be prompted for additional information/comments. If prompted, enter the information as required and press Enter for OK.
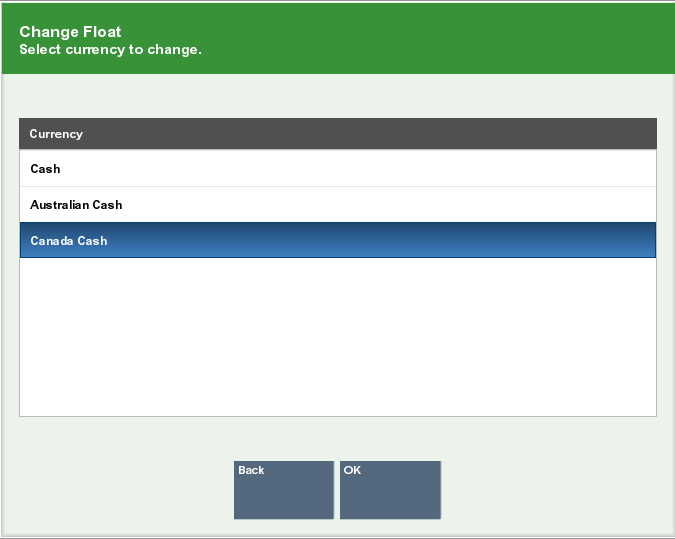
If your store is configured for foreign cash currency tenders to be given equally modify, select the type of float tender from the list.
Effigy 11-7 Change Float - Currency List
-
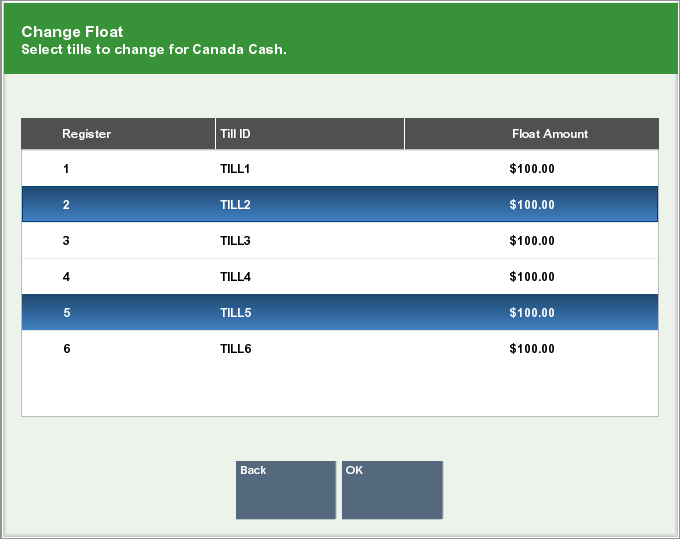
The system displays a list of tills. Use the up and downwards arrow keys to select the till(s) you want to change (press the Spacebar to select multiple tills). After y'all select all of the tills you desire to change, printing Enter for OK.
Figure 11-eight Till List - 2 Tills Are Selected
-
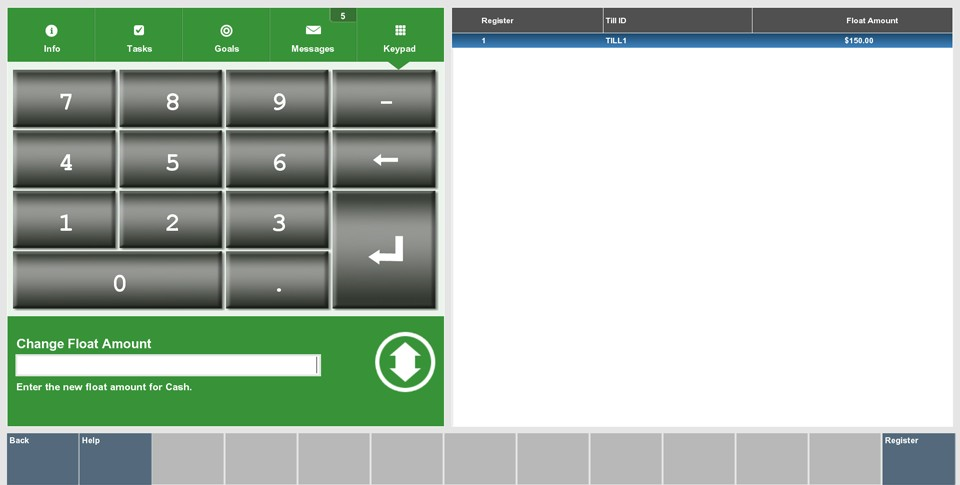
The system prompts for the new float amount for the selected tills. Enter the new float corporeality for the tills in the list and press Enter.
Figure 11-9 New Bladder Amount Prompt
-
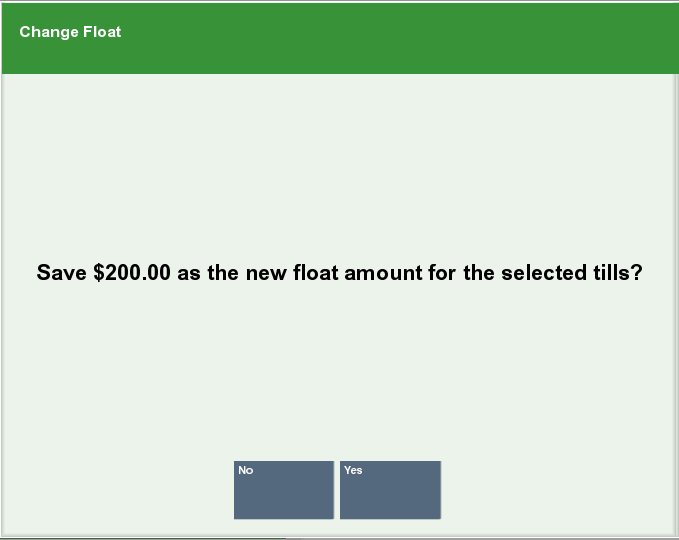
The arrangement prompts to confirm the new bladder corporeality for the selected tills. Press Y for Yeah to accept the new bladder corporeality. The system updates the float amount to the new value for the selected tills and returns to the Chief Menu.
Effigy xi-10 Ostend New Float Amount Prompt
Foreign Currency Maintenance
Yous can edit the currency commutation rate for the foreign currencies that are accustomed as tenders for sale transactions, if your store policy allows it. Some currency rates fluctuate frequently, so you lot can edit the commutation charge per unit every bit often as necessary.
Annotation:
Your organisation'south configuration may make Foreign Currency Maintenance available from the Register Till Options menu as well every bit from the Back Part Till menu.-
At the Till carte, select the Till Options option.
-
From the Till Options menu (Effigy 11-3), select the Foreign Currency Maint. option.
-
If the system prompts for a security login, enter your employee ID and password and select Process.
-
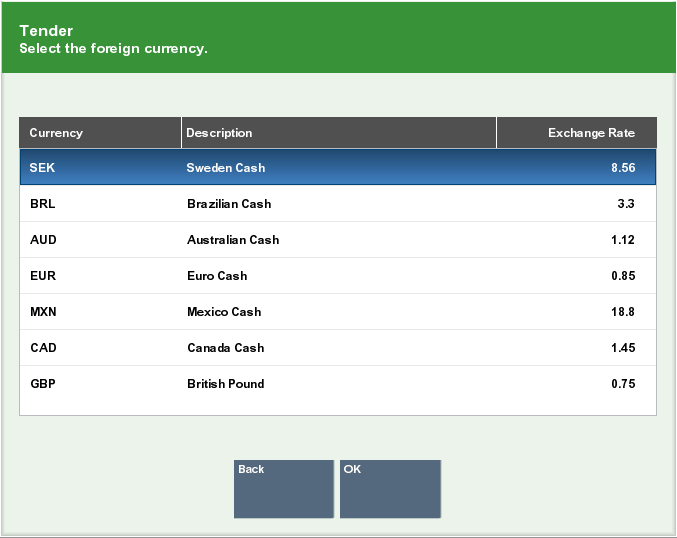
Oracle Retail Xstore Point of Service displays a listing of currencies. Select the currency whose substitution rate y'all are changing, so press Enter for OK.
Effigy 11-11 Foreign Currency Listing
-
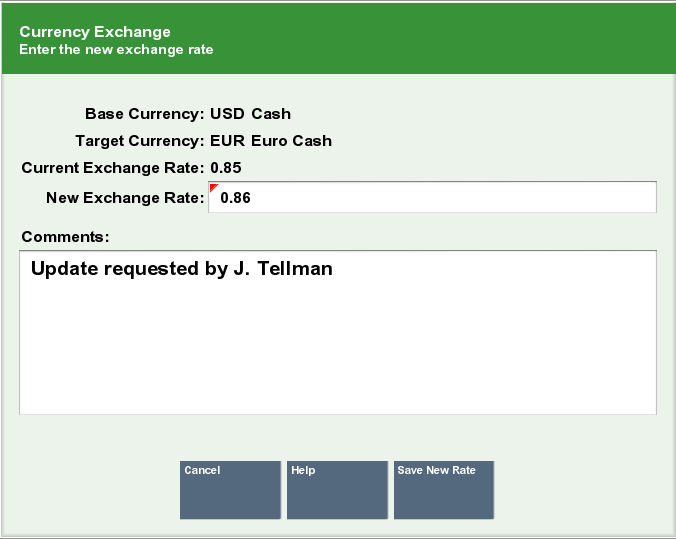
The system displays the electric current information for the currency y'all selected. Enter the new exchange charge per unit and a comment, and so select Salvage New Rate.
Figure 11-12 New Exchange Charge per unit
-
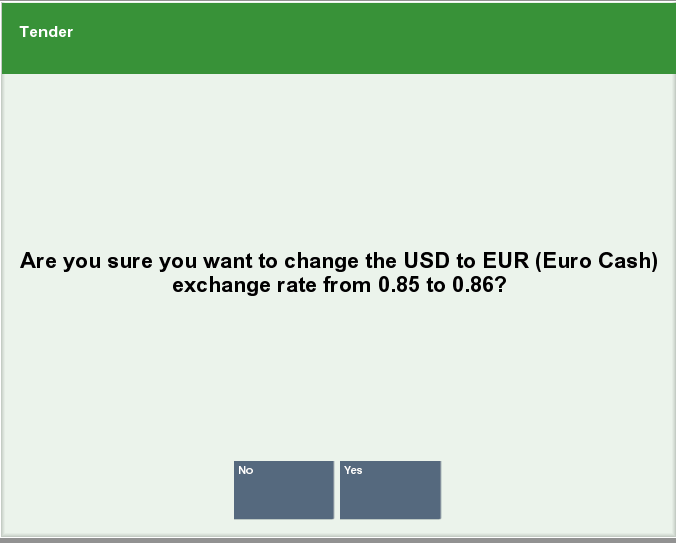
Oracle Retail Xstore Point of Service prompts whether to modify the exchange charge per unit. Select Yes to continue.
Effigy 11-13 Confirmation Prompt
-
The new currency commutation charge per unit is at present constructive and the arrangement prints a receipt with the new exchange rate. Oracle Retail Xstore Bespeak of Service returns to the Main Menu.
Note:
About exchange rate calculations in currency conversions:-
The exchange rate with the base currency ID of the local currency ID is the value that is used to calculate a converted currency amount. The exchange rate is stored as a cistron of the local exchange rate.
-
The conversion is calculated by multiplying the local currency by the commutation rate.
-
Performing Paid In/Paid Out Transactions
A Paid In transaction allows you lot to move funds into a till from non-sale sources such as returned check charges, constitute money, and change from a Paid Out transaction.
A Paid Out transaction moves funds out of a till for non-refund purposes such as business expenses and function supply purchases.
Store policy controls the list of valid reasons that y'all tin can select for performing a Paid In or Paid Out transaction. In improver, store policy controls whether or not receipts are produced by these two transactions.
The Paid In and Paid Out transactions may also be available on the Till Options Carte at the annals.
Note:
A till must be attached to the annals to perform Paid In/Paid Out transactions. If a till is not fastened and one of those options is selected, a message is displayed indicating that a till must exist attached for the transaction to be performed.In an just networked cash drawer surround y'all are required to browse the cash drawer barcode to link it to the transaction earlier the drawer pops.
In a mixed network/local cash drawer environment, select whether to utilise a network greenbacks drawer.
Paid In Transaction
-
From the Till Menu, select the Till Options option.
-
From the Till Options menu, select the Paid In option.
Figure 11-14 Till Card - Paid In Choice
Note:
If the annals has more 1 cash drawer, you lot may be prompted to select the till to exist used for this process.
-
The system prompts you to enter a paid out receipt barcode. If y'all are now placing funds back into the till from a previous paid out transaction and yous take the receipt, browse or enter the barcode and printing Enter. Otherwise, just press Enter to bypass this prompt.
Figure xi-15 Paid Out Receipt Barcode Prompt

-
Select a reason for this Paid In transaction and press Enter for OK.
Figure xi-sixteen List of Paid In Reasons
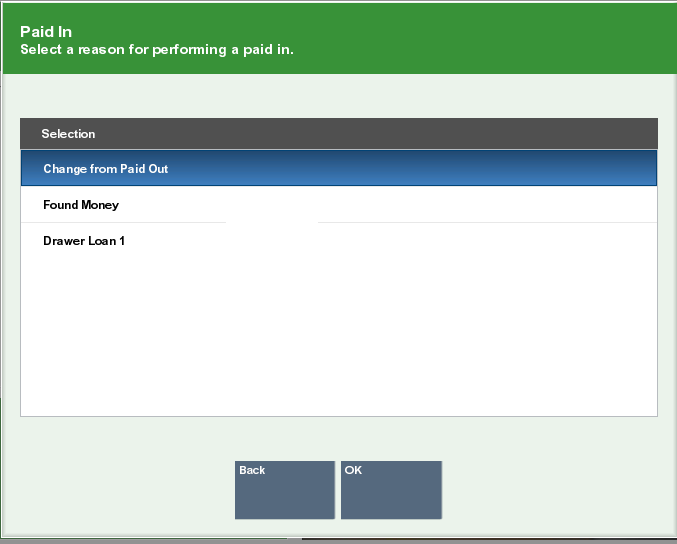
Note:
There may be additional prompts for information (such as a comment) depending upon the specific reason code that yous select.
-
At the Amount prompt, enter the cash corporeality you are calculation to the till and printing Enter.
Figure 11-17 Enter Amount Prompt

-
Oracle Retail Xstore Point of Service prompts you to close the cash drawer (if configured to do so), prints a receipt, and returns to the Chief Menu.
Effigy 11-18 Paid In Receipt
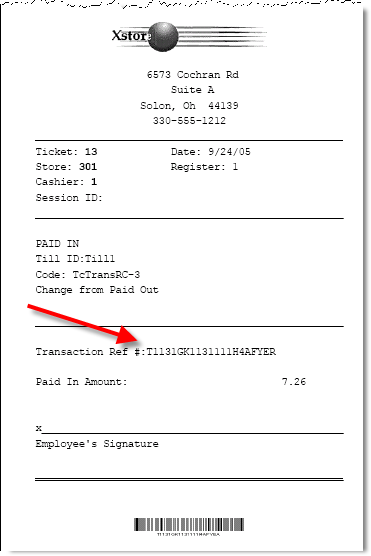
Note:
Notation the reference to the original paid out transaction number shown in this example. This information associates the original paid out transaction with the current paid in transaction for accounting purposes.
Paid Out Transaction
-
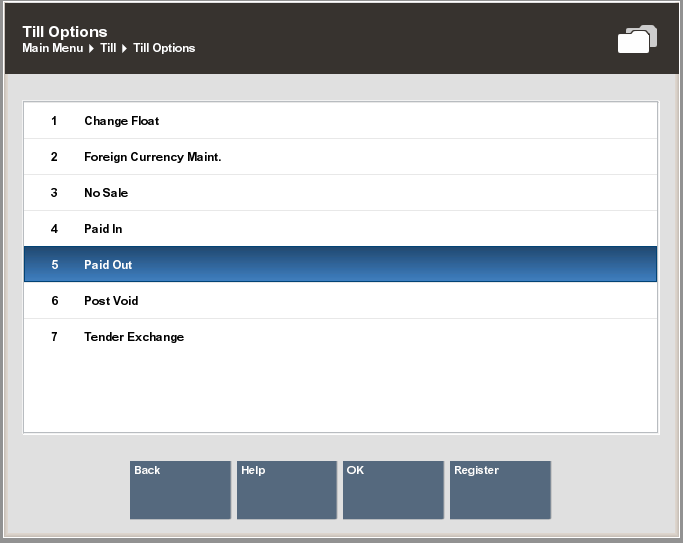
From the Till Menu, select Till Options.
-
From the Till Options card, select the Paid Out option.
Figure 11-19 Till Menu - Paid Out Option
Note:
If the register has more than one greenbacks drawer, you may be prompted to select the till to be used for this process.
-
Select a reason for this Paid Out transaction and printing Enter for OK.
Figure eleven-twenty Listing of Paid Out Reasons
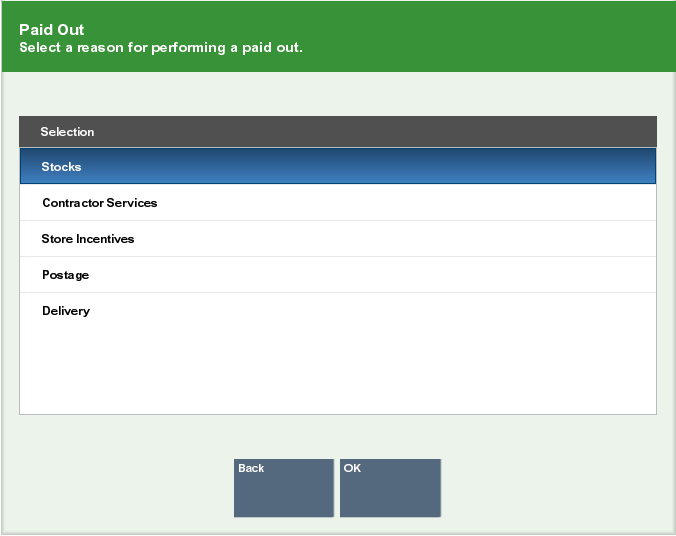
Note:
There may exist boosted prompts for information (such as a annotate) depending upon the specific reason lawmaking that y'all select.
-
At the Amount prompt, enter the cash corporeality you are removing from the till and press Enter.
Figure 11-21 Enter Corporeality Prompt
-
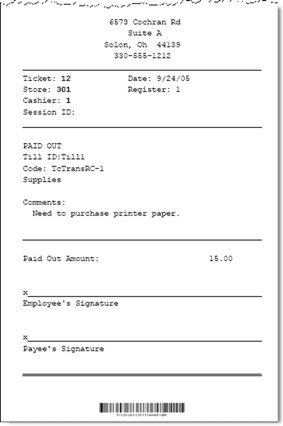
Oracle Retail Xstore Point of Service prompts you to close the greenbacks drawer (if configured to practice and then), prints a receipt, and returns to the Main Menu.
Figure 11-22 Paid Out Receipt Sample
Post Voiding Transactions
Performing a Mail Void transaction changes the status of a sales transaction to Void. Just transactions for the current business engagement tin can be post voided.
All records in the arrangement are reset, almost as if they had never occurred during the original transaction, and the transaction tape is retained in a voided land.
Certain kinds of sale transactions may involve extended transactions — activities related to the transaction that occur outside of the system. For example, special orders, piece of work orders, and layaways are extended transactions.
Figure xi-23 Post Void - Extended Transaction Prompt
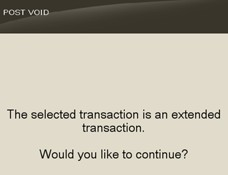
Although the system checks for such conditions when a post void is executed, some aspects of the transaction may need to be reversed by an additional transaction such as a return. If the organisation detects an extended transaction, a prompt to keep or discontinue the post void process displays.
The types of transactions that may be post voided are determined by the domicile office.
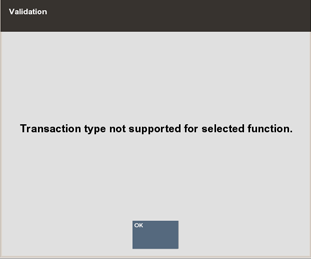
If yous scan or enter a barcode for a transaction blazon that cannot be post voided (such as a timecard transaction), the system displays a message indicating that the transaction type cannot be post voided. Press Enter for OK to admit the message and the system returns to the Till menu.
Figure 11-24 Post Void - Transaction Type Not Supported
You can post void transactions from the register (see the Oracle Retail Xstore Point of Service User Guide), from the Electric Journal (see Post Voiding a Transaction), or from the Till menu.
-
At the Till menu, select Till Options.
-
From the Till Options menu, select the Mail Void option.
Effigy 11-25 Till Options Bill of fare - Post Void Option
Note:
A till must be attached to the register to perform a transaction void. If a till is non attached, this selection may be grayed out on the menu (Register Accountability mode), or a message may be displayed if the Post Void carte du jour choice is selected (Till Accountability mode). If the register has more than one cash drawer, you may be prompted to select the till to exist used for this process.In an merely networked cash drawer environment you are required to scan the greenbacks drawer barcode to link it to the transaction before the drawer pops.
In a mixed network/local greenbacks drawer environment, select whether to use a network greenbacks drawer.
-
At the Mail service Void prompt, scan or enter the transaction information and select Process to continue.
Figure 11-26 Post Void Prompt

-
Oracle Retail Xstore Signal of Service prompts: Are you lot certain you desire to post void the selected transaction? Select Yes to continue with the post void transaction.
-
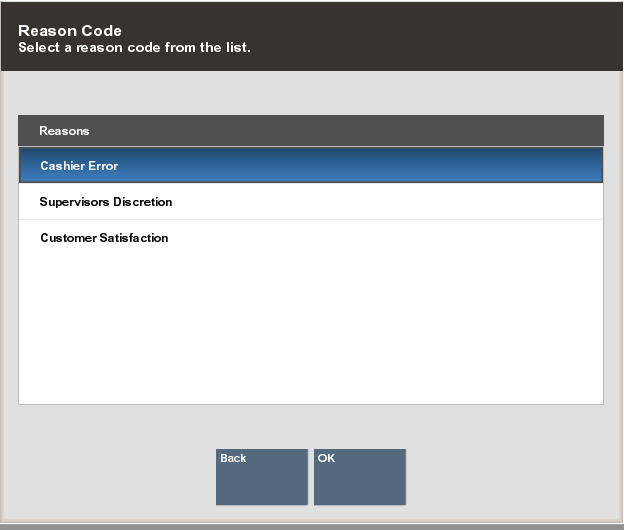
The system prompts for the reason you are performing the post void. Select a reason from the list and press Enter for OK.
Effigy eleven-27 Mail service Void Reasons
-
The system may prompt for a comment nearly the mail service void. If prompted, type a comment and printing Enter for OK to proceed.
-
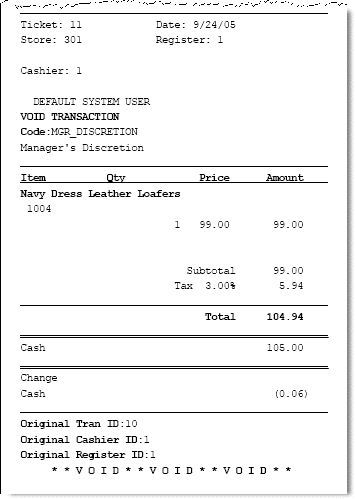
Oracle Retail Xstore Point of Service postal service voids the transaction, prints receipts, and returns to the Main Menu.
Figure eleven-28 Post Void Receipt
Register Accountability Mode Functions
This section describes the register accountability functions:
-
Cash Pickup
-
Greenbacks Transfer
-
Till Audit
-
Mid-solar day Deposit
-
Cash Drawers
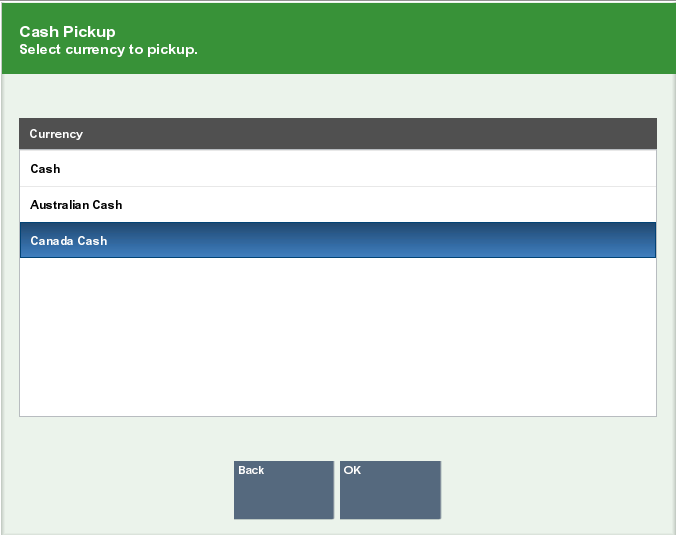
Greenbacks Pickup
Cash Pickup moves cash from the till to the store safe. It is a cash drawer feature that allows an operator to take cash from a till so that the amount does not exceed a specified threshold corporeality. Each tender type that is physically in the till can be picked up, for example, greenbacks, foreign currencies, or coupons. The annals shows a prompt, if the cash in the till is over the set maximum amount. See Greenbacks Pickup using a Safe Bag if using a safe bag to collect the greenbacks.
Note:
This process may differ from the greenbacks pickup transaction performed by a cashier. Run across the Oracle Retail Xstore Point of Service User Guide for more than information about this transaction type.To perform a Cash Pickup:
-
From the Till menu, select the Till Maintenance choice.
-
From the Till Maintenance menu (Figure eleven-4), select the Cash Pickup pick.
-
If your store is configured for foreign cash currency tenders to be given every bit change, select the type of tender from the list.
Figure 11-29 Cash Pickup Currency List
-
If the register has more than 1 greenbacks drawer, you are prompted to select a till for the pickup. Select the till and press Enter for OK.
Notation:
In an merely networked cash drawer environment you are required to browse the cash drawer barcode to link it to the transaction before the drawer pops.In a mixed network/local cash drawer environment, select whether to utilize a network cash drawer.
-
You lot are prompted to enter the amount of the pickup. Enter the amount and printing Enter.
Figure 11-30 Cash Pickup Amount

-
A receipt prints for the Cash Pickup. Oracle Retail Xstore Point of Service returns to the Principal Menu.
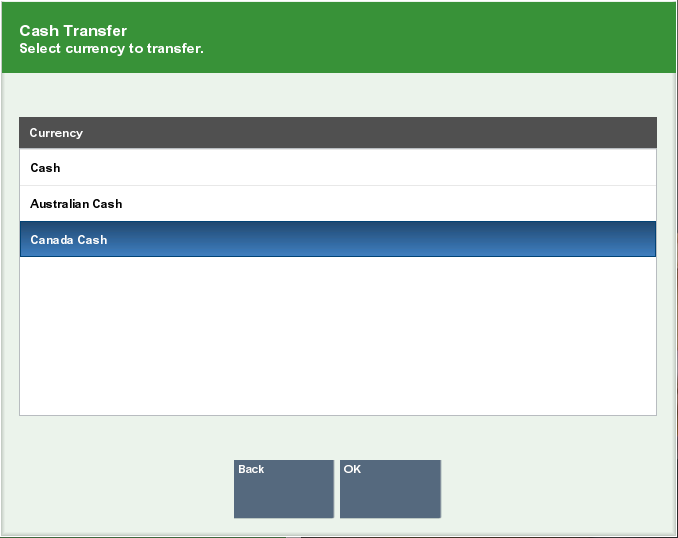
Cash Transfer
Cash Transfer moves cash from the shop condom to a till.
To perform a Cash Transfer, practice the following steps:
-
From the Till card, select the Till Maintenance option.
-
From the Till Maintenance menu (Effigy xi-4), select the Greenbacks Transfer option.
Note:
If the annals has more one greenbacks drawer, you may be prompted to select the till to be used for this process.In an only networked cash drawer environs you are required to scan the cash drawer barcode to link it to the transaction before the drawer pops.
In a mixed network/local cash drawer environment, select whether to apply a network cash drawer.
-
If your shop is configured for foreign greenbacks currency tenders to exist given every bit change, select the blazon of tender from the list.
Figure 11-31 Cash Transfer Currency Listing
-
You are prompted to enter the amount of the Greenbacks Transfer. Enter the amount, then press Enter.
Effigy eleven-32 Cash Transfer Amount Prompt

-
A receipt prints for the Greenbacks Transfer and Oracle Retail Xstore Point of Service returns to the Main Carte.
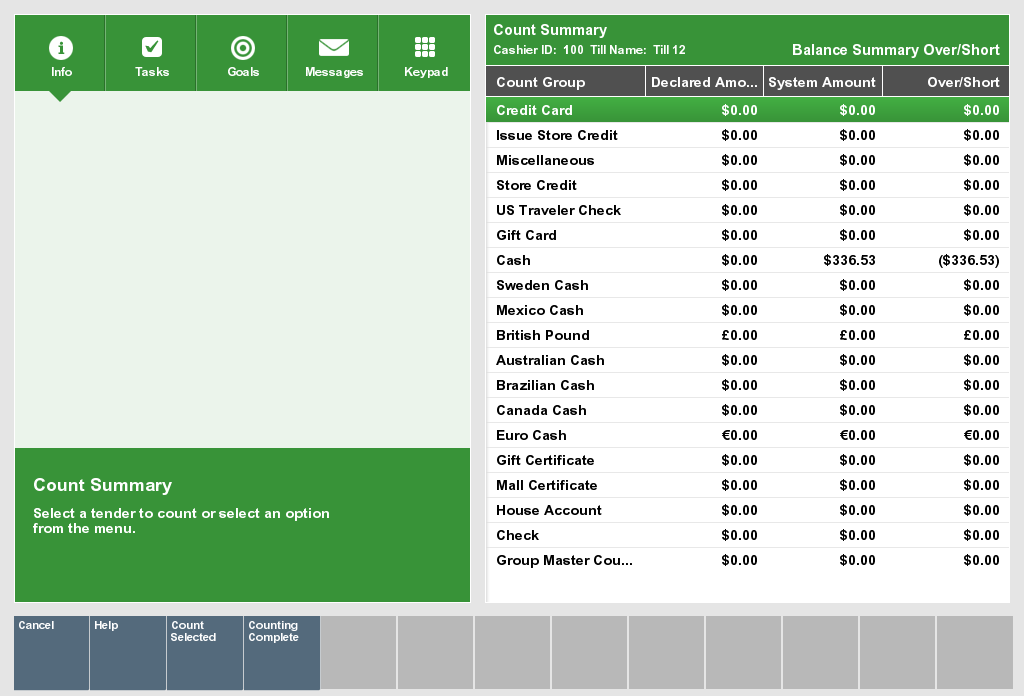
Till Audit
Till Audit provides the capability to select a tender type, tape its full current value, and see if that value balances with the corporeality that the system shows for the same tender. The organization calculates and displays any difference (over/short) between the 2 amounts.
A Till Audit may be performed any time later on the Beginning Count and before the Ending Count. The till does not need to be removed after the audit is completed.
-
From the Till carte, select the Till Maintenance option.
-
From the Till Maintenance carte du jour (Effigy 11-iv), select the Till Audit selection.
Note:
If the register has more than than ane cash drawer, yous may be prompted to select the till to be used for this procedure.In an only networked greenbacks drawer environment you lot are required to scan the cash drawer barcode to link it to the transaction earlier the drawer pops.
In a mixed network/local cash drawer surroundings, select whether to use a network cash drawer.
-
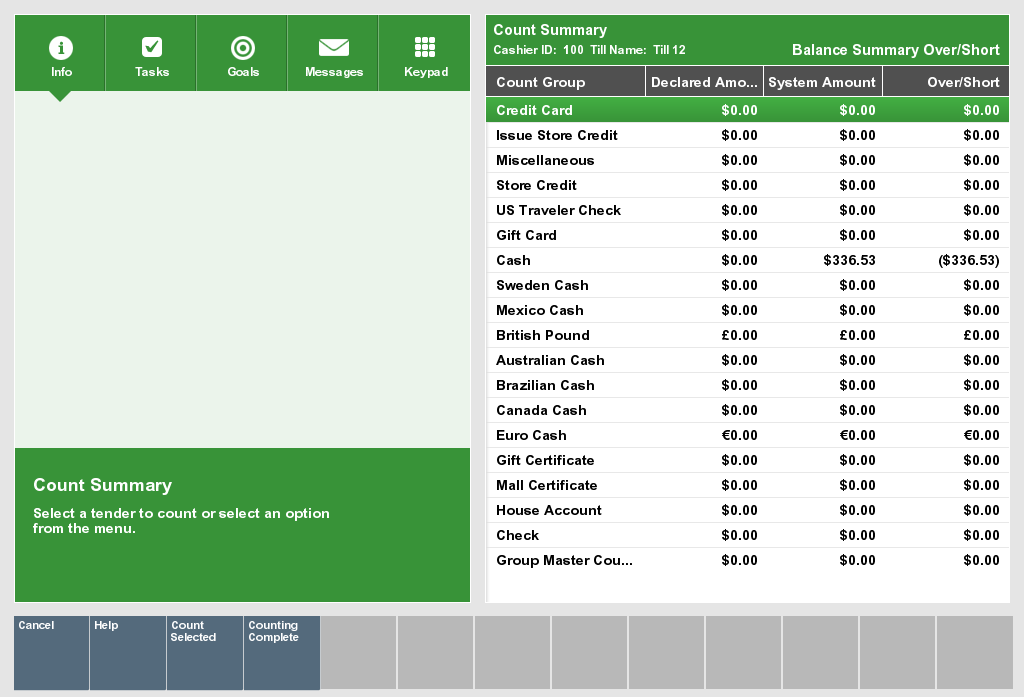
At the Count Summary screen, select the tender type you lot want to count and select the Count Selected option. Apply the up and downwards pointer keys to scroll through the list if necessary.
Effigy 11-33 Audit Count - Count Summary Screen
-
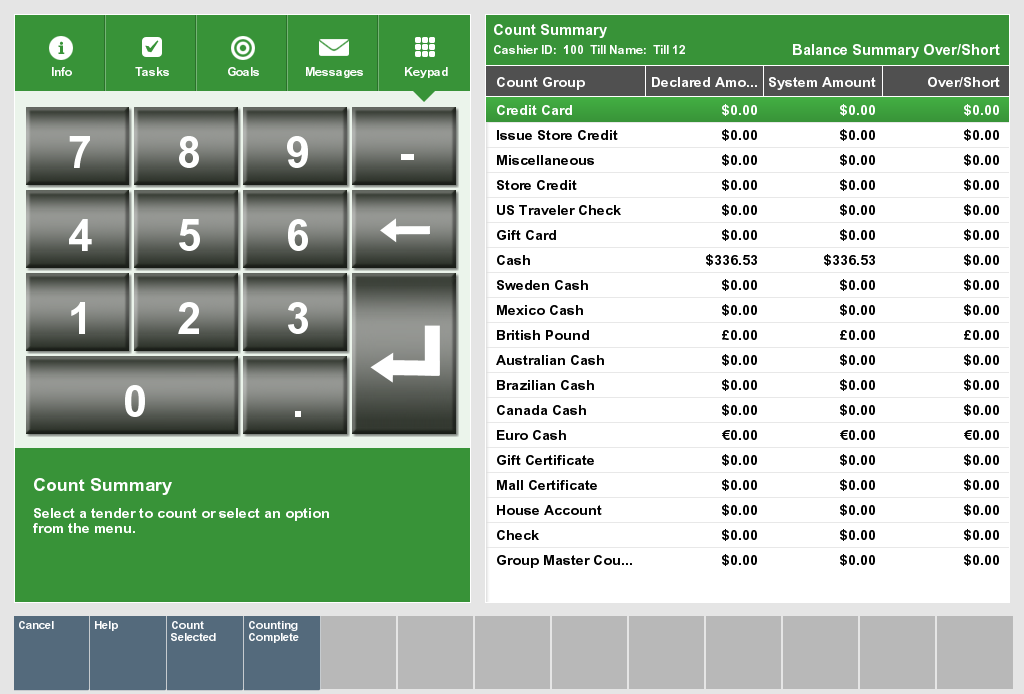
Enter each value equally required in the focus bar and press Enter. The tender type you select and your system'southward configuration determine the blazon of count you must perform. For examples of count screens, run into Tender Count Screen Xstore Base of operations Examples - Standard.
-
Subsequently you complete the count for the selected group, select the Next Group option, and repeat this footstep for boosted groups that y'all desire to count.
-
After you count all groups that you want to audit, select the Summary selection to render to the Count Summary screen. Check the Over/Short column to encounter if your till is now balanced with the organisation values for each tender type.
Figure 11-34 Count Summary Screen - Audit Complete
-
Select the Done Counting option when you lot complete your audit of the till.
-
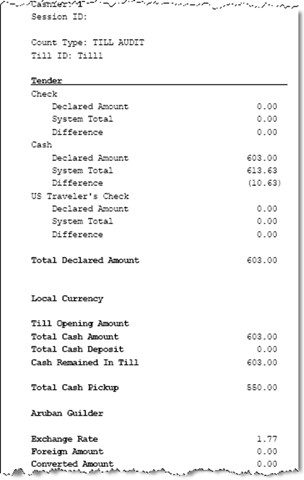
The system prints a Till Audit receipt for your records.
Figure xi-35 Till Audit Receipt (pick only)
-
Close the greenbacks drawer. The system returns to the Till Options menu.
Mid-day Deposit
Mid-day Eolith allows you to place funds from a register into the store safe during the course of a working session. This activity is not necessarily restricted to a specific time, and may be used as ofttimes as necessary.
-
From the Main Menu, select Till to display the Tills menu.
-
Select Till Maintenance from the Till menu.
-
At the Till Maintenance menu (Effigy eleven-iv), select the Mid-day Deposit selection. The system opens the cash drawer when you select this option.
Note:
If the register has more one cash drawer, you may be prompted to select the till to exist used for this process.In an merely networked cash drawer environment you are required to browse the greenbacks drawer barcode to link it to the transaction before the drawer pops.
In a mixed network/local cash drawer environment, select whether to use a network cash drawer.
-
The Count Summary screen displays a list of tender groups that may be removed from the till and deposited in the store prophylactic. Select the tender type you lot want to count and select the Count Selected choice.
Figure 11-36 Count Summary Screen - Mid-24-hour interval Count

-
Enter each value equally required in the focus bar and printing Enter. The tender type y'all select and your system's configuration determine the blazon of count you must perform. For examples of count screens, encounter Tender Count Screen Xstore Base Examples - Standard.
-
If boosted funds are to be placed into the store condom, select the Adjacent Group selection to display the input screen for the next tender type.
-
Enter the count and amount values for the next tender grouping that y'all selected.
Tip:
You lot may select Prior Group to render to the previous tender grouping in the list.
-
Select the Summary selection to render to the list of all tender groups.
-
-
At the Count Summary screen, select the Done Counting choice.
Figure eleven-37 Mid-24-hour interval Count Summary Screen - Washed Counting
Note:
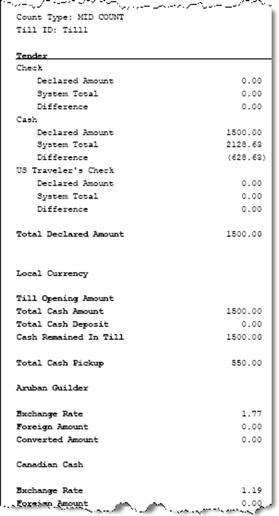
The difference between the Alleged Amount (your count) and the System Corporeality is the corporeality remaining in the till.
-
The system prints a receipt for the Mid-twenty-four hour period eolith.
Figure 11-38 Mid-Day Deposit Receipt
-
Close the cash drawer. The organization returns to the Main Carte du jour.
Cash Drawers
This section describes the Cash Drawer options:
-
Attaching a Greenbacks Drawer Till
-
Removing a Greenbacks Drawer Till
-
Reconciling a Networked Greenbacks Drawer Till
Attaching a Cash Drawer Till
Employ this process to adhere a till into the networked cash drawers in order to track money in the greenbacks drawer.
-
From the Till carte du jour, select the Till Maintenance pick and press Enter for OK.
-
From the Till Maintenance menu, select the Attach Cash Drawer Till choice and press Enter for OK.
-
The system displays a listing of tills available to be attached.
Effigy 11-39 Select Cash Drawer Till to Attach
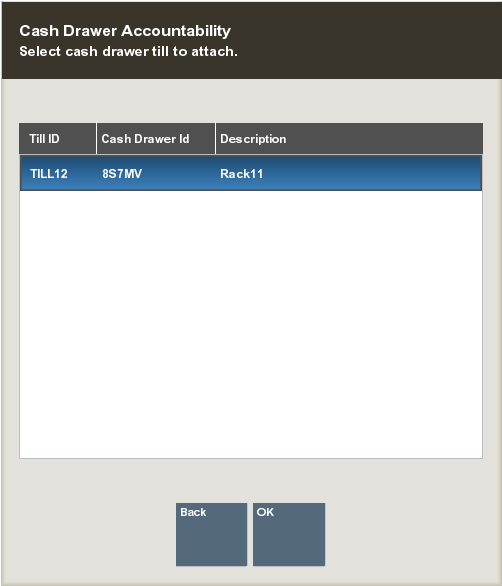
Select a till from the list and press Enter for OK.
-
Scan the cash drawer. The cash drawer ID is verified to decide information technology is in the correct state.
If the scanned drawer is not in the correct state, an fault message is displayed. "Cash drawer is currently unavailable." Press Enter for OK.
If the scanned cash drawer barcode does non lucifer to the selected greenbacks drawer, an error message is displayed "The scanned cash drawer does not match the selected cash drawer." Printing Enter for OK.
-
Confirm you desire to attach the till to the cash drawer: "Are you sure you want to attach till to greenbacks drawer <cash drawer id and name>?" Select Yes on this prompt, to go on.
The cash drawer is opened and the till is fastened to the cash drawer.
A confirmation bulletin is displayed: "Till <insert till name> has been attached to cash drawer <Greenbacks Drawer ID and name>."
Press Enter for OK and close the drawer. You lot are returned to the Xstore Abode screen.
-
Echo this process for further cash drawers.
Removing a Cash Drawer Till
Oracle Retail Xstore Indicate of Service gives managers and associates the pick to remove their own till from a register or remove a till assigned to someone else, depending on the selection chosen in the Manage Tills menu. The ability to combine the greenbacks drawer shut and reconcile processes together is configurable.
To remove a till from a networked enabled cash drawer, do the post-obit:
-
From the Till card, select the Till Maintenance option.
-
From the Till Maintenance menu, select Remove Greenbacks Drawer Till.
-
Oracle Retail Xstore Point of Service displays a list of tills attached to the cash drawer.
Figure eleven-forty Select Cash Drawer Till to Remove
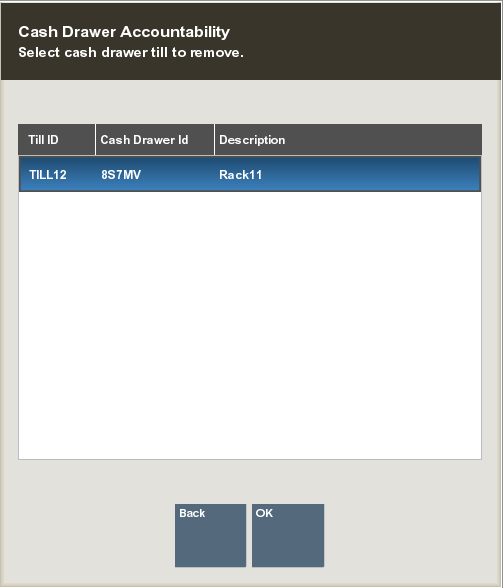
Select the till you are removing, then press Enter for OK.
-
Scan the cash drawer. The cash drawer ID is verified to decide it is in the correct land.
If the scanned drawer is not in the correct country, an error message is displayed. "Greenbacks drawer is currently unavailable." Press Enter for OK.
If the scanned cash drawer barcode doesn't lucifer to the selected cash drawer, an error message is displayed "The scanned cash drawer does not match the selected cash drawer." Press Enter for OK.
-
Ostend you want to remove the till from the cash drawer: "Are you lot sure y'all want to remove till from cash drawer <cash drawer id and name>?" Select Yeah on this prompt, to go on.
The greenbacks drawer is opened and the till is removed from the cash drawer.
A confirmation bulletin is displayed: "Till <insert till name> has been removed from greenbacks drawer <Cash Drawer ID and name>."
Press Enter for OK and close the drawer. Y'all are returned to the Xstore Dwelling screen.
-
Repeat this procedure for further cash drawers.
Reconciling a Networked Cash Drawer Till
This process allows a you to reconcile the transactions associated to a cash drawer. Information technology does not reconcile the annals. You need to close the cash drawer first (at any fourth dimension) and and then reconcile the cash drawer (at any time). The greenbacks drawer does not take to be closed earlier the End of Day Procedure. This is particularly applicable for 24/7 trading to minimize downtime.
-
From the Till menu, select the Till Maintenance option.
-
From the Till Maintenance carte du jour, select the Reconcile Cash Drawer option.
Figure xi-41 Till Maintenance - Reconcile Cash Drawer
The ability to combine the Cash Drawer Close and Reconciliation Processes is configurable (for register accountability in a normal store environment). Therefore, if configured, the reconciliation process would begin straight after the Cash Drawer Close flow. In 24/seven trading the cash drawer and reconciliation processes is divide.
-
Any register'south dorsum part tin be used to reconcile networked cash drawers.
The Networked Cash Drawer Reconciliation button is always bachelor. If you effort to access it and no cash drawers are available to reconcile, an error message "All closed greenbacks drawers accept been reconciled." is displayed.
-
Select the cash drawer to reconcile from a list of cash drawers bachelor to reconcile.
Figure xi-42 Cash Drawer Selection
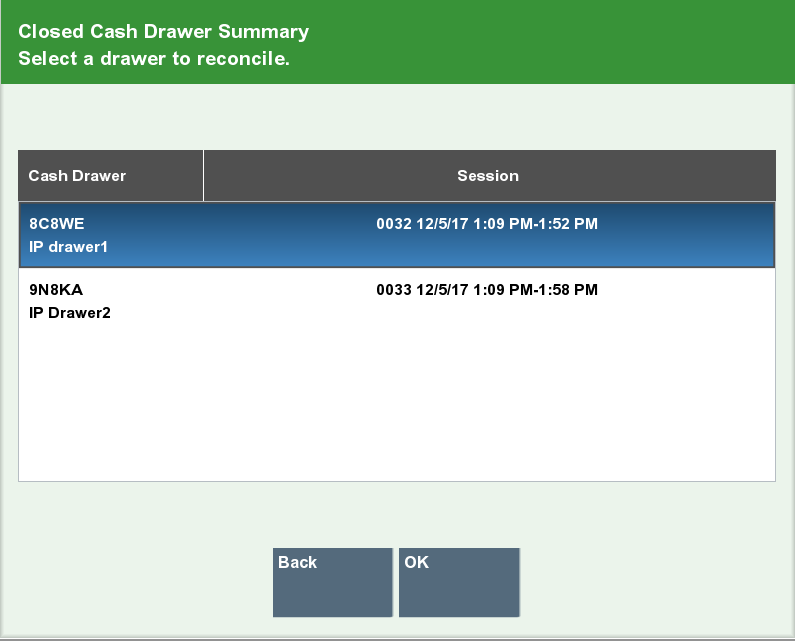
Once a cash drawer has been reconciled, information technology is no longer displayed on the listing of bachelor greenbacks drawers to reconcile.
The cash drawers do not have to be reconciled in a specific gild. The greenbacks drawers' name, description and Session ID are listed.
-
Select the Greenbacks Drawer and printing the OK push button.
The arrangement prompts y'all with the question: "Do you want to reconcile the post-obit greenbacks drawer? <Insert Cash Drawer Device Proper name>".
Figure xi-43 Confirm Cash Drawer Reconciliation
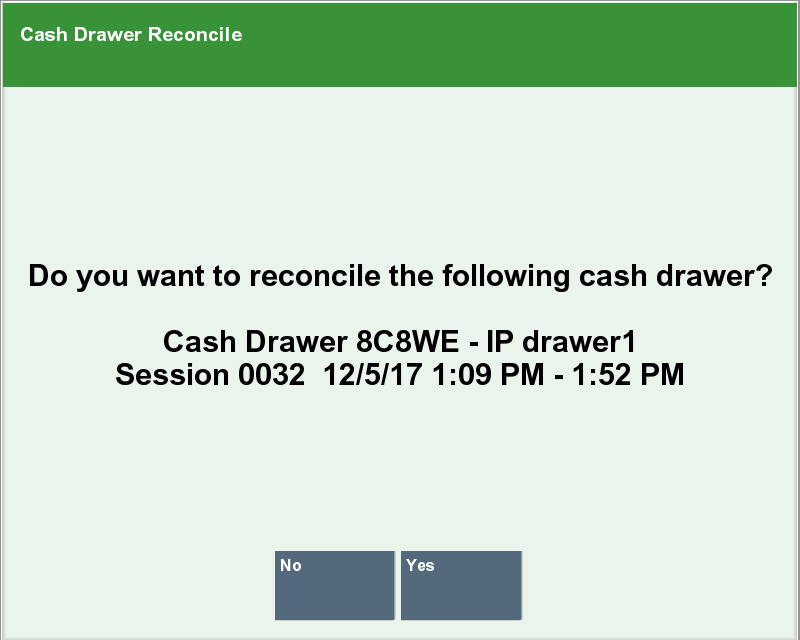
Select Yeah on this prompt, to go along.
-
The existing Xstore reconcile catamenia is followed for the limited tenders accepted on the networked cash drawer. Any transaction from any register completed on the cash drawer and has the selected networked cash drawer's ID saved with the transaction should exist reconciled at this time.
The cash drawer has been reconciled and the user is returned to the Xstore Habitation screen.
Till Accountability Mode Merely Functions
This section describes the till accountability functions:
-
Issuing a Till (Till Accountability Mode Only)
-
Attaching Other Till (Till Accountability Way Merely)
-
Removing a Till (Till Accountability Fashion Only)
-
End Count Other Till (Till Accountability Mode Only)
-
Returning a Till (Till Accountability Mode Only)
-
Reconciling a Till (Till Accountability Mode But)
Issuing a Till (Till Accountability Way Only)
Note:
Prerequisites: No tills tin can be issued until the shop prophylactic is open. See Shop Safety Maintenance for more information.-
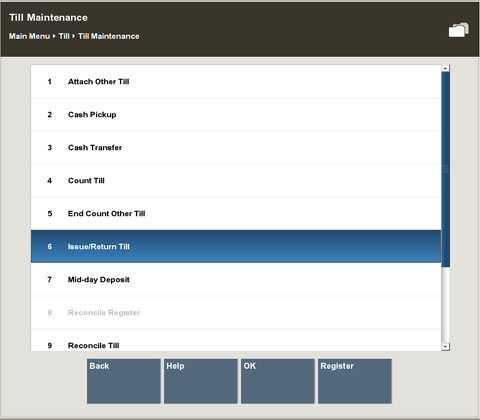
From the Till Carte du jour, select the Till Maintenance option and printing Enter for OK.
-
From the Till Maintenance carte du jour, select the Consequence/Render Till pick and printing Enter for OK.
Figure 11-44 Till Maintenance Menu - Result/Return Till Option

-
The system displays the Till Details screen, showing the current status of the tills.
Figure 11-45 Till Details Screen
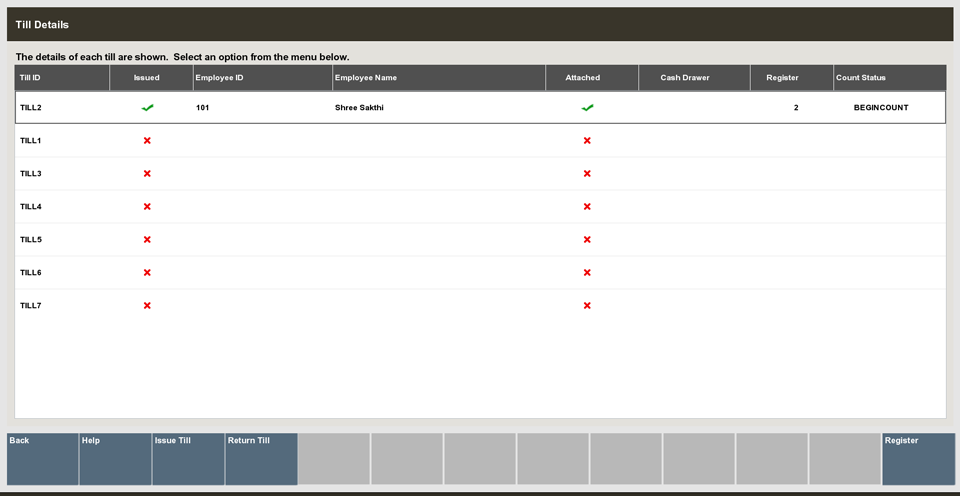
Near this screen:
A red X (
 ) in the Issued column indicates that the till has been returned to the greenbacks office and is bachelor for assignment.
A green check mark (
 ) in the Issued column indicates that the till has already been issued to an acquaintance and is not available.
Note:
All the tills listed in this example are available for assignment.
-
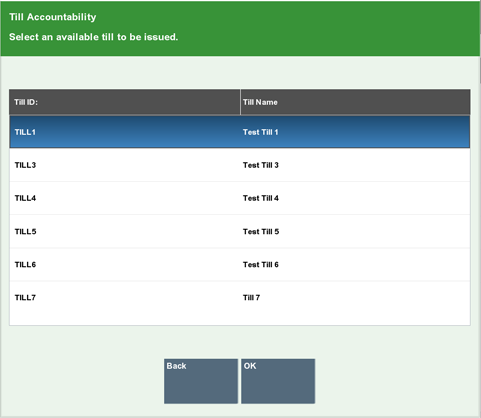
Select the Event Till button. The organization displays a list of bachelor tills. Select a till from the list and press Enter for OK.
Figure xi-46 Bachelor Till List
-
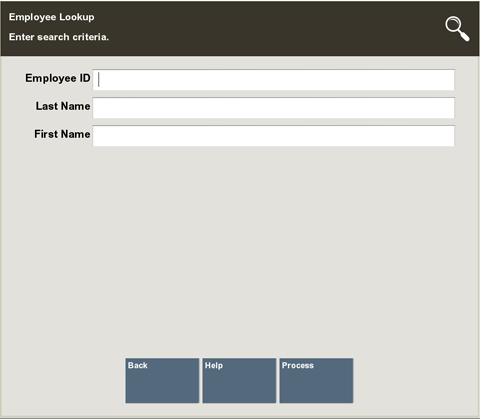
An Employee Lookup prompt opens. Enter the search criteria (Employee ID, Get-go Proper name and/or Last Name) for the employee to be assigned to the till and select Process.
Figure 11-47 Employee Lookup Prompt
-
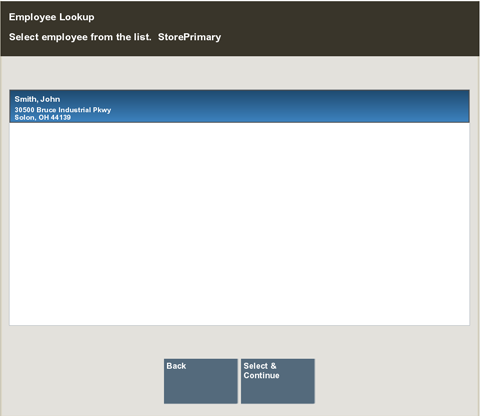
The system displays a list of employees matching the entered search criteria. Select the employee's name that is being issued the till and press Enter to continue.
Figure 11-48 Employee Selection List
-
Oracle Retail Xstore Point of Service prompts for the corporeality of starting cash in the till, and may show the default starting cash amount fix for this till. Accept the default greenbacks corporeality or enter the starting cash corporeality and press Enter.
Figure 11-49 Starting Cash Prompt

Note:
If your store allows foreign cash to be given every bit modify, additional prompts may display in the focus bar for each denomination. Continue to enter the amount and press Enter for each prompt until the confirmation prompt displays.
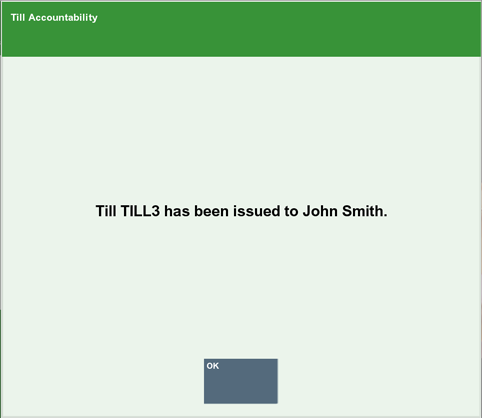
The arrangement displays a message confirming that the till is at present issued to a specific employee.
Figure eleven-50 Issued Till Confirmation
-
Printing Enter for OK to close the confirmation prompt. A receipt is also printed for your records.
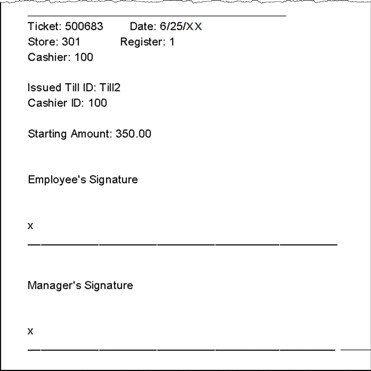
Effigy xi-51 Till Assigned Receipt
-
Oracle Retail Xstore Point of Service assigns the till to the cashier and returns to the Till Details screen. The till is now listed every bit Issued.
Figure 11-52 Till Details - Issued Till
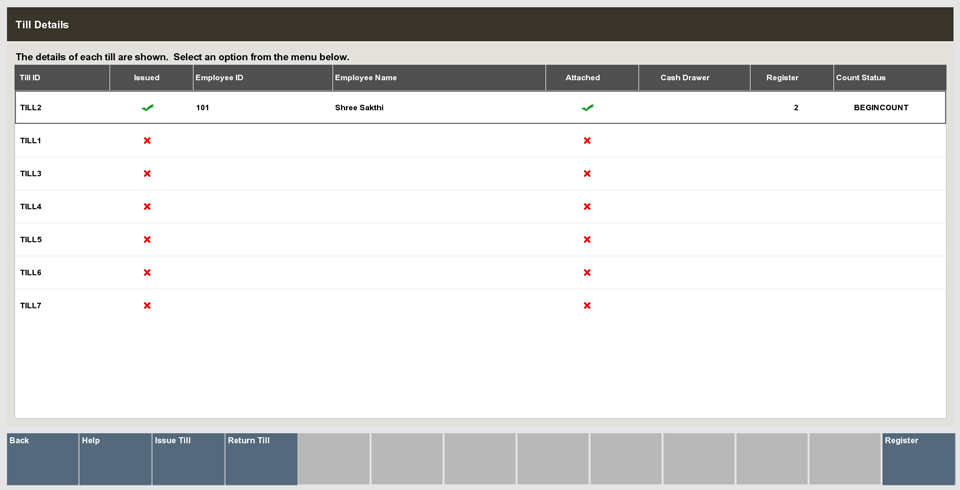
About this screen:
-
A green cheque mark (
) in the Issued column indicates that the till has been issued to the employee. -
A red X (
) in the Attached cavalcade indicates that the till has non yet been attached to a cash drawer and register.Oracle Retail Xstore Point of Service generates a new session ID to identify the session that was started past assigning a till to a cashier.
Note:
A cashiering session begins when the till is withdrawn from the cash management office and assigned to a cashier. The session ends when the till is reconciled.
The till is now assigned to a specific cashier. When the cashier logs in to the annals, Oracle Retail Xstore Point of Service prompts the cashier to verify the starting corporeality in the till and to attach the till to the register before ringing sales.
Note:
Refer to the Oracle Retail Xstore Bespeak of Service User Guide for more information nigh using till accountability at the greenbacks register.
-
Attaching Other Till (Till Accountability Mode But)
Later on a till has been issued to a cashier, the till must be attached to a register for it to be used for transactions.
Normally, an associate has the power to attach a till assigned to them after logging in to the system where the till is located. However, if a manager is attaching another employee'south till to a register, this must exist done through the Adhere Other Till option.
-
From the Till carte du jour, select the Till Maintenance pick and printing Enter for OK.
-
From the Till Maintenance menu, select the Adhere Other Till choice and press Enter for OK.
-
The system displays a list of tills available to exist attached. Select a till from the list and press Enter for OK.
-
If your system is configured to let ii (two) tills on the annals and both cash drawers are however available, the system prompts for the greenbacks drawer to use for the till. Select the greenbacks drawer to be used, then press Enter for OK.
-
Perform the Begin Count on the till.
See To Perform a Brainstorm Count for the Begin Count procedure.
At the confirmation prompt, select OK.
Removing a Till (Till Accountability Fashion Only)
Oracle Retail Xstore Point of Service gives managers and associates the option to remove their own till from a annals or remove a till assigned to someone else, depending on the option chosen in the Manage Tills carte.
To remove a till, practise the post-obit:
-
From the Manage Till menu, select the Till Maintenance option, then press Enter for OK.
-
From the Till Maintenance menu, select Remove Till or Remove Other Till option, and so printing Enter for OK.
-
If you selected Remove Other Till, keep with step iii.
-
If you lot selected Remove Other Till, Oracle Retail Xstore Point of Service displays a list of tills attached to the register. Select the till you are removing, then press Enter for OK. Skip to step 5.
-
-
The system prompts whether to remove the till from the register.
-
Press Y or select Yes to remove the till.
-
Press Northward or select No to go along the till attached to the annals and return to the Manage Tills bill of fare.
-
-
Oracle Retail Xstore Betoken of Service displays a message confirming that the till has been removed from the register. Printing Enter for Ok to shut the prompt.
-
A receipt prints for the till removal and Oracle Retail Xstore Point of Service returns to the Till Maintenance carte du jour.
End Count Other Till (Till Accountability Way Only)
To end count a till assigned to whatever employee, practice the following:
-
From the Till menu, select the Till Maintenance pick, so press Enter.
-
From the Till Maintenance menu, select the Cease Count Other Till option, and then press Enter for OK.
-
The system prompts you to select the till that is being end counted. Select the till, and then printing Enter for OK.
-
Keep the terminate count process equally with a normal endmost count.
-
See Closing the Register for a clarification of the closing count procedure.
Returning a Till (Till Accountability Fashion Only)
Before a till can be reconciled, the till must be marked as Returned. This indicates that the till has been transferred from the control of the associate/cashier to the managing director.
Prerequisites: The following steps must exist completed before y'all can return a till.
-
The till must be finish counted
<AND>
-
The till must be removed
See End Count Other Till (Till Accountability Mode Simply) and Removing a Till (Till Accountability Mode Only).
-
From the Till Menu, select the Till Maintenance selection and press Enter for OK.
-
From the Till Maintenance card, select the Result/Return Till option and press Enter for OK.
Effigy 11-53 Till Maintenance - Issue/Return Till
-
The system displays the Till Details screen, showing the current condition of the tills. Select the Return Till bill of fare option.
About this screen:
-
Count Status: A Count Status of ENDCOUNT indicates that the till has been end counted by the associate.
-
Attached : A red 10 (
)in the Attached column indicates that the till has been removed from the register. -
Issued : A light-green check mark (
) in the Issued column indicates that the till has non yet been returned to the manager.
-
-
The system displays a list of tills that can be returned. Select the till from the list and press Enter for OK.
-
Oracle Retail Xstore Point of Service displays a message confirming that the till has been returned. Press Enter for OK to acknowledge the message.
-
The system returns to the Till Details screen, with a red x adjacent to the Till showing it as Returned. Select the Back selection to return to the Back Part.
About this screen
A ruby x in the Issued column indicates that the till is Returned. The till tin now be reconciled.
Reconciling a Till (Till Accountability Mode Just)
The final check of a till is performed at till reconciliation, when the till is counted and checked against the amount the cashier counted for the till. Following till reconciliation, the till is airtight.
Important:
Prerequisites: The post-obit steps must exist completed before you tin can reconcile a till:
-
The till must accept an ENDCOUNT status. Action: The associate has performed a close count on the till.
-
The till has been removed from the annals. Activity: The associate has performed the Remove Till function at the register.
-
The till has been returned, indicating the till has been transferred from the control of the acquaintance to the greenbacks manager. Activity: The cash managing director has marked the till as returned using the Result/Return function.
See also: Cease Count Other Till (Till Accountability Mode Simply), Removing a Till (Till Accountability Mode Simply), and Returning a Till (Till Accountability Way Simply).
-
From the Till menu, select the Till Maintenance selection and printing Enter for OK.
-
From the Till Maintenance bill of fare, select the Reconcile Till option and press Enter for OK.
-
Select a till to reconcile from the list of tills and press Enter for OK.
-
At the Count Summary screen, select the tender type you lot want to count and and then select the Count Selected option.
Note:
Depending upon the configuration of your system, the over/short amounts every bit shown above may not be displayed.Select the View Over/Short Reasons push button to review comments regarding the terminate count.
-
Enter each value as required in the focus bar and printing Enter. The tender type you select and your system's configuration determine the type of count you lot must perform. For examples of count screens, see Tender Count Screen Xstore Base Examples - Standard.
-
After you complete the count for the selected grouping, select the Next Group option, and repeat this step for additional groups that yous want to count.
-
Later you count all groups that y'all desire to audit, select the Summary option to return to the Count Summary screen.
-
The system records the data, prints a reconcile receipt for your records, and returns to the Till Management carte.
Figure 11-54 Reconcile Receipt
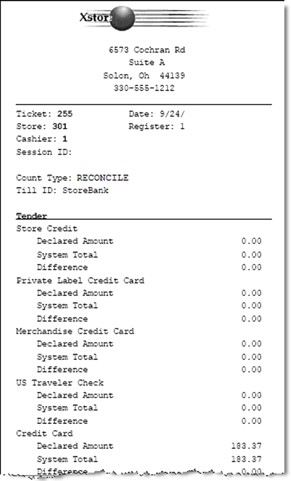
Note:
Deposits from the reconciled till are made to the store safety.

Is Closing A Register Like Auditing,
Source: https://docs.oracle.com/cd/E62106_01/xpos/pdf/200/html/managers_guide/till_management.htm
Posted by: cordesciediand.blogspot.com
0 Response to "Is Closing A Register Like Auditing"
Post a Comment